The change in coop design can result in a major improvement. In addition to chicken manure applying its benefits to soil fertility, chickens can roam and munch on bugs and weeds.
Constructing your own chicken tractors is not impossible. Once you grasp the construction components needed, what remains is finalizing the dimensions.
That’s when you can gather materials and get started.
Covering this topic will save you countless hours of research, allowing you to start your chicken menagerie project with ease.
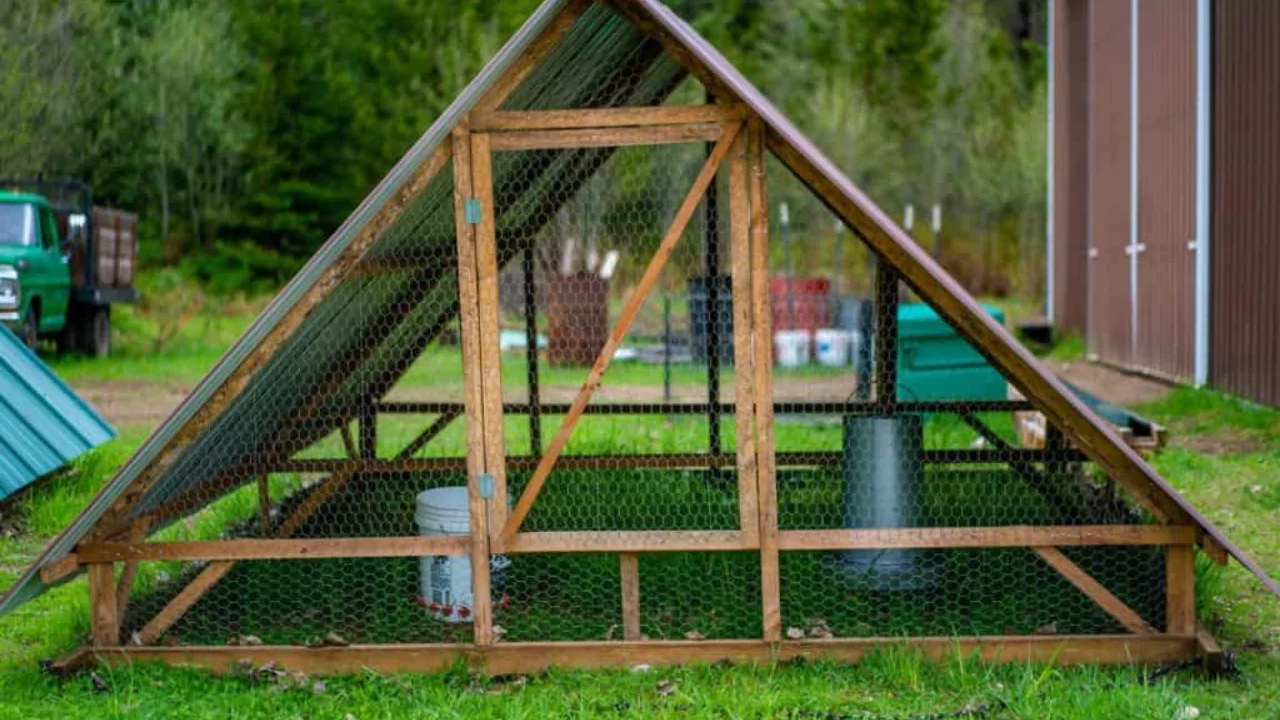
Construct a Chicken Tractor Frame
The frame serves as the foundational base which supports all component parts of the chicken tractor.
Selecting from numerous available designs will also set your frame’s dimensions.
You may select from various designs including:
- A rectangular structure
- An A-frame chicken tractor
- A simple structure made of PVC pipes
Tip: As is the case with many items, offer less expensive recycled materials to cut cost and still retain structural integrity.
Now, here’s how to build a frame (we’re sticking to the most common rectangular wooden frame here):
- Plan 8 square feet per bird housed for large fowls such as Orpingtons and Australorps while reserving 4 square feet per bird for smaller breeds like bantams. If you have 4 large hens, then a 4×4 feet frame would suit them perfectly. Or aim for a structure with dimensions of 8×10 feet to double the number of chicks you can house.
- Assemble the base using lumber of appropriate size and deck screws.
- Prioritize lightweight design with your tractor as that is a top concern when planning your portable chicken coops. To achieve an easily movable tractor, prioritize use of light materials, lean toward PVC or lighter woods. Additionally, choose smaller diameter wood, using 2x4s or 4×4 inch pieces will be adequate.
- Attach a heavy-duty rope to the front part of the frame so that the tractor can be pulled with ease. You can also curve the base runners to minimize resistance while moving the structure.
- Construct an equally tall structure to that height your chicken tractor is planned at which would establish its total height After deciding on run area and nesting box heights (which I will elaborate further on later) erect side frames for your chicken tractor which should have a minimum height of four to five feet for additional vertical space.
- Now add in a front frame in addition to side frames.
- Use screws for the rear frame attachment and add vertical braces to support roof and nesting areas when added.
- A frame is complete only after you’ve attached supports that hold the roof covering, made of either tin or corrugated plastic.
Furnish the Nesting Area
Next, construct a covered area so birds can safely roost.
This is where your birds will co perch during the night, incubate eggs, and gather for their evening gathering. You may position it indoors, above, or next to the chicken tractor unit.
But what dimensions do the nesting boxes require? This will rely on your preferred breeds.
- For smaller bantam hens, 10 inches deep, 12 inches wide and 10 inches high boxes will suffice.
- For average size hens like Sussex and Leghorns increase box dimensions to 12 inches deep, wide and tall.
- For larger breed jersey giants increase dimensions further to 12 inches deep, 14 inches wide and 12 inches tall boxes.
Remember to provide ample room in the coop as overcrowding can lead to aggressive behaviors that may injure your chickens.
To construct the nesting boxes, follow these steps:
- Use plywood. While formulating the frame, cut out windows and a pophole which will be used for ramp placement to allow free movement of the birds.
- Position these boxes at least 20 inches above the floor level of the unit so that they are safe from predators. This also increases space available for grazing.
- Next, attach blocks of plywood on those braces with decking screws and secure them to the frame.
- Equip the coop with nesting spaces alongside a perpendicular perch made from 2 x 2 lumber planks, which will serve as roost bars offering safe perching spots for your birds.
- Add doors at both the back and front of the nesting area so you can gather eggs easily whilst closing them off from predators outside after using hinges and latches making them secure.
- Use wire mesh to cover the window openings instead of chicken wire. This type of wire is denser and provides greater safety.
- Construct a nesting area and attach tin or plastic panels to its upper section, using screws with rubber washers to make slanted roofs while adding space for ventilation.
Enclose the Chicken Run
When constructing the chicken run boundary make sure to cover every side while leaving the bottom open.
This is where your chickens will graze on fresh grass as you relocate the tractor which should be done daily if possible.
You can further customize and scale down the chicken tractor plans to better fit your requirements. But primarily, the chicken tractors are meant for your chickens to move about freely, everything from a 6 ft long and 8 ft wide run area is generous.
Yet, the larger you make it the better.
So now all that is left is to buy some chicken wire fence mesh? Well, not really.
Instead, opt for hardware cloth even though it isn’t budget friendly it provides added protection against predators hence justifying its price tag.
Here’s a guide on how to enclose your chicken run:
- Before fixing any hardware cloth to the frame, make sure you put a hinged door at the grazing area’s edge first. This step is optional but aids greatly in serving food or drinks…as well as an easter egg hunt during off feeding times through back flap serves on egg retrieval.
- Make sure to staple the hardware cloth securely using heavy duty staples and ensure that the wire goes on the inner side of the structure.
- If your area experiences sudden hot spells, it is advisable to provide some sort of shading to cover the grazing area. This can be as simple as a shade cloth or more permanent like corrugated tin roofing.
- There are also ways to keep birds warm in areas that frequently experience high winds and cold temperatures. You may use wood or tin roofing panels and fasten them to the sides of the run as cladding.
Attach the Wheels
The only remaining task needed for finishing your portable chicken coop is adding wheels, just like you guessed earlier.
Most people tend to associate cumbersome units with needing at least two horses for towing purposes. Without wheels, moving large tractors would certainly require horse power.
The effectiveness of moving your tractor largely depends on how well equipped it is in terms of wheel setup.
Here are a few ideas on how to build a wheel setup:
- Use 10 inch wheels or smaller diameter depending on size of chicken tractor
- Drill a hole in the frame approximately 10 inches from the back and 2 inches above the bottom of the runners. It would be best to ensure that the wheels are positioned low enough so that there is a good grip to the ground.
- Another option would be to use large hinge straps for attaching the wheels.
- Predator proofing as well as making certain your tractor lays flat on the ground when parked can be achieved with installing a wheel lift system. For this mechanism, you need to attach levers into theframe and fix wheels onto it. Depending on whether you want to pull up or down will determine if you want to move the tractor or keep it resting.
Start Building Your Chicken Tractors
With this knowledge, you chicken tractors should take shape easily!
All plans for chicken tractor structures are open to improvisation. Scale them depending on your particular situation.
Rest assured with some determination you’ll transform a small area into a real grazing paradise for your backyard chickens.
Decide which design works best and get started designing out those plans!.
Also, look into other related topics like chicken tractors. The Gardening Channel offers numerous articles on gardening and related topics. Cultivating a green space is turning into a skill; hone the skills you want and turn your dreams into reality.